Checklist
Click on the step to see instructions:
1. Set up your teacher account
If you don't have an account yet, you'll need to create one. Here are the steps for creating a teacher account:
- Sign up here. Type in your first and last name, then click 'next'.
- Type in your email and add a secure password. You can use your work or private email, but we recommend using your work email. If you forget your password you can request a new one here
- You will need to agree to Sumdog's Terms of Use and Privacy Policy. Make sure you read through and understand these policies, then click the box to confirm. Please feel free to contact us if there's anything you're concerned about. Click 'next'
- A confirmation email will be sent to the email address you registered with. You must verify your account using the link in the confirmation email within 14 days. If the account is not verified within 14 days, the account will be deleted. To verify your account, click on the link in the email or copy and paste the web address into your browser
- Log into your account here. When you log into your account for the first time you will be prompted to search for your school and request to join it.
2. Make sure your teacher account is in the correct school
If you've changed schools, you'll need to move your teacher account to your current school. If you are the only teacher on the school account, you will not be able to remove yourself from the school. Instead email support@sumdog.com and we will manually remove you from the school account.
Otherwise, follow the steps below:
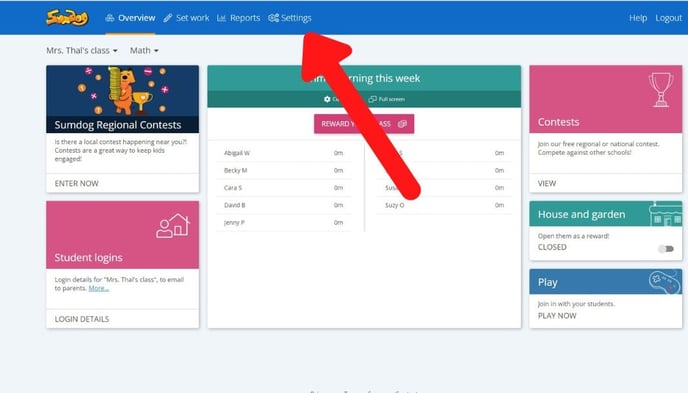
- Click 'settings' at the top of your Teacher Dashboard
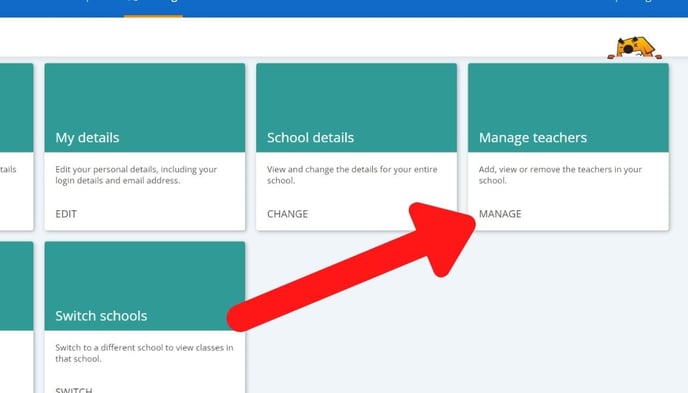
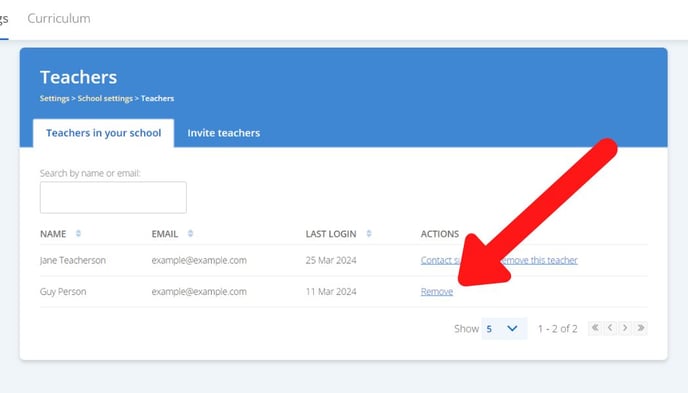
- Click 'manage' in the Manage Teachers box
- Click 'remove' next to your name
- You will no longer be linked to a school account. To join your new school, another teacher on the account must invite you to join.
- Once a colleague has invited you to join the school, you will receive a link to your email. Click on the link and then click ‘switch schools’ at the bottom of the page. Your teacher account will then be moved from your old school's account to your current school's account. This will not move any student accounts.
3. Invite teachers to join your school
You can invite teachers from the 'Manage Teachers' page in Settings. Inviting a teacher will send the teacher an email notifying them that you have invited them to join your school.
If the teacher already has a teacher account, they will just need to click on the invite link to be added to the school. If the teacher does not have a teacher account yet, they will be invited to create one.
Click here for full instructions with images.
4. Set up your classes
If your school is set up on Wonde or Clever, your classes will automatically be updated on Sumdog according to the information shared with us on your school's external roster.
Click here to read more about Wonde (England), or here to read more about Clever (US).
If your school is not set up on Wonde or Clever, you'll need to set up your classes by uploading a spreadsheet or by moving students manually.
How to create and rearrange classes by uploading your classes via spreadsheet
You can create new classes and rearrange the students in existing classes by uploading a spreadsheet. The spreadsheet must include each student's first name, last name, grade, and class, exactly as it is entered on Sumdog. For example, if a student has a Sumdog account with the name Christopher Smith, the name on the spreadsheet must also be Christopher, not Chris.
The spreadsheet must not include any headings. Here's an example of a correctly formatted spreadsheet: 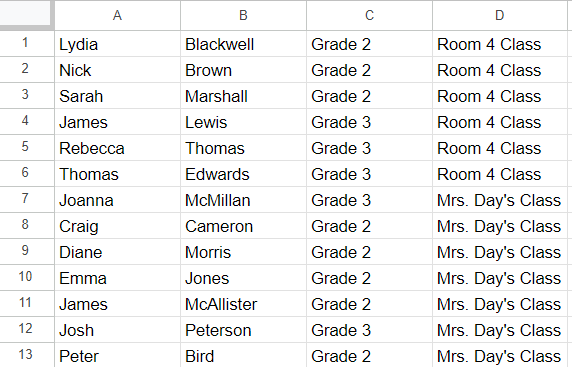
Here are the instructions for uploading your spreadsheet:
- Go into Settings from your dashboard
- Click 'manage' in the Manage Students box
- Click 'upload student details' near the top right of the page

- You can either paste the date ('paste students') or upload a spreadsheet ('import students'). If you select 'paste students', you will need to paste the data from the spreadsheet into the box. The remaining steps will be same as if you were uploading the spreadsheet. If you select 'import students', you will need to select a file to upload from your computer.

- After pasting or selecting your spreadsheet, you need to confirm what you would like to do with the data. To create or rearrange classes, choose the second option. To change student login details and create or rearrange classes, choose the third option. Click 'next'
- If there are students in your school who have never signed in and whose accounts were created over six months ago, the next page will ask if you wish to remove those accounts. If you are uncertain, click 'No, do not delete any students'. Click 'next'
- On this page, you will be asked to confirm the data in each column. Click on the dropdown menu at the top of each column to confirm which date type is shown in each field. Click 'next'

- Optional: If there is more than one student with the same name in the spreadsheet or system, you need to confirm which account in the system the student belongs to (if any).
- Example: Two students have been uploaded with the same name from a spreadsheet. The system asks which existing account belongs to the student.
If both students are new, select ‘new student’ from the dropdown menu for both of them. If one of the students has an existing account, select the matching account from the dropdown list.
- Example: Two students have been uploaded with the same name from a spreadsheet. The system asks which existing account belongs to the student.
- Click ‘next’
- You will now be shown a preview of the upload so you can see which accounts will be created and which accounts will be changed. If everything looks correct, click 'save students'
- The final page will show you a summary of how many accounts have been created and how many existing students were moved to a new class. Click 'done'.
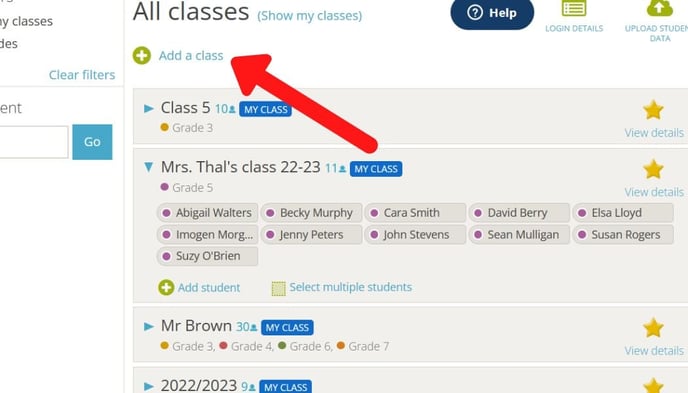
How to add a class manually
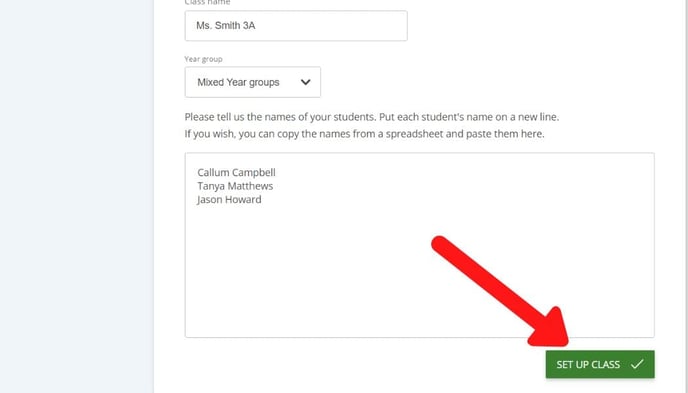
Besides updating a spreadsheet, you can also add a class manually and type in your students' names.
- Select 'settings' at the top of the Teacher Dashboard
- Click on 'manage' in the 'manage students' box
- Click 'add a class'. This will allow you to create new student accounts or move existing accounts to a new class
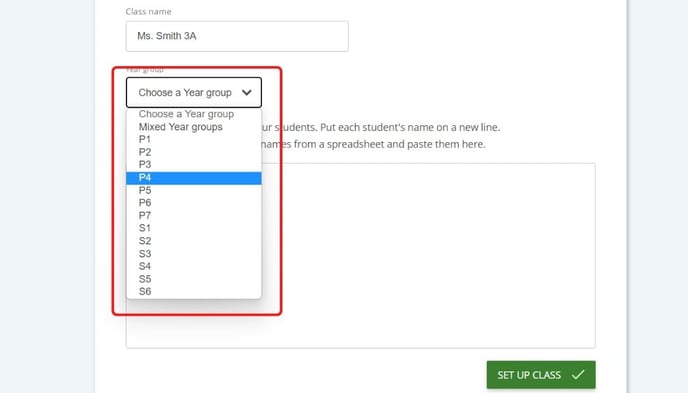
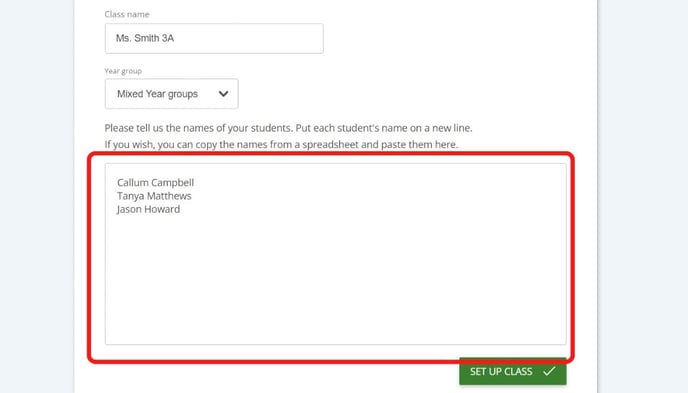
- Enter your class details. If the class is made up of students from different grades, choose 'mixed grades' when selecting the grade in the dropdown menu.
- Type in or copy and paste the first and last name of the students in the text box
- Click 'set up class'
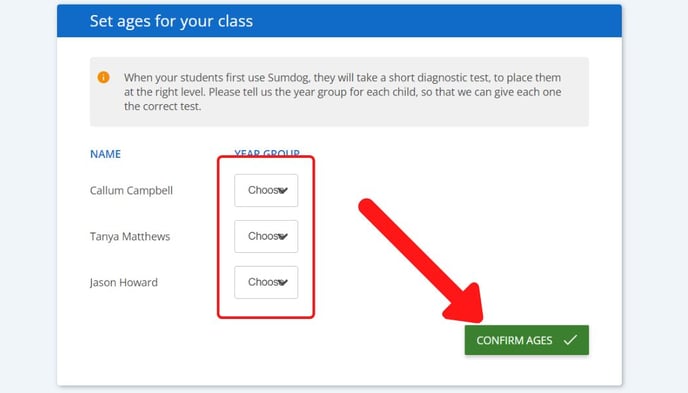
- Optional: If you selected 'mixed grades' in Step 4, you'll now be able to choose each student's grade from the dropdown menu. Click 'confirm ages'
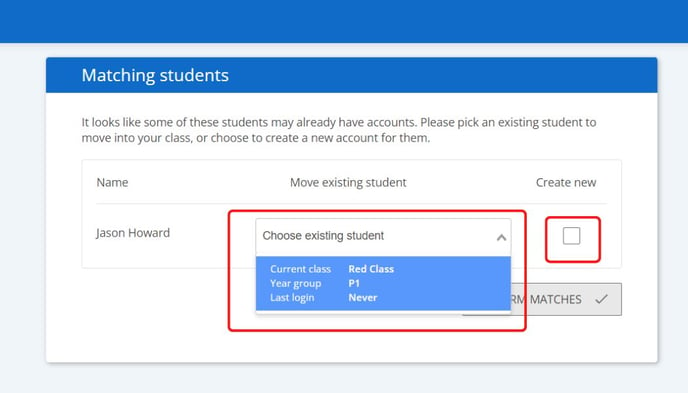
- Optional: If there is a student in the school with a matching name, you need to confirm if the student you are adding has an existing account or if they are a new student. Click on the dropdown menu to view the other accounts with the same name. If one of the results is a student you are trying to add to a new class, select this account. If the student you are adding is a new student, click on 'create new'
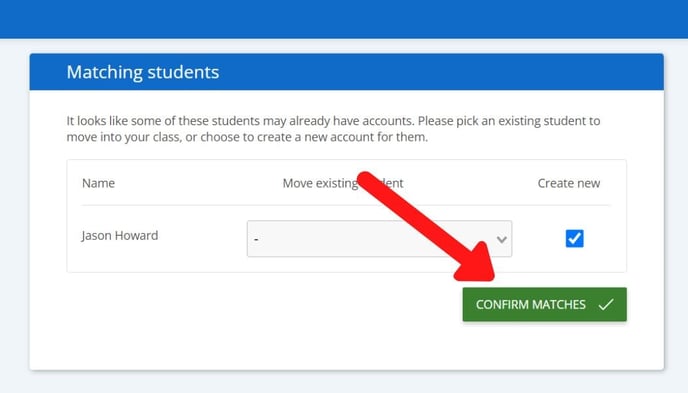
- Click 'confirm matches' to create your class and add your students
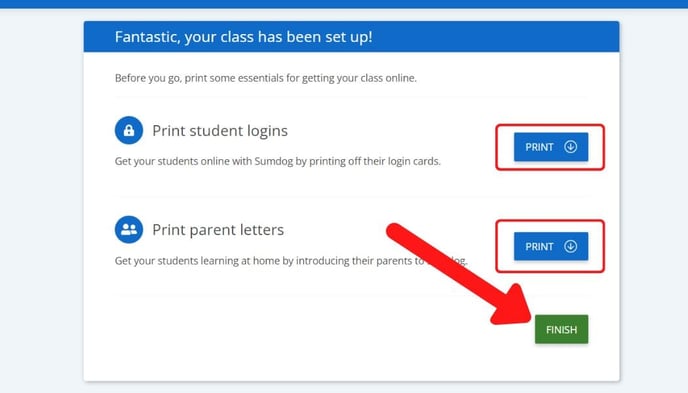
- Click 'print' to print out the students' login details and a letter for parents (this can also be done later). Click 'finish' to complete the setup of your class and return to the dashboard
How to move students between classes manually
You can move students between already existing classes by dragging and dropping them on the Class Roster page.
- Click 'settings' from the Teacher Dashboard
- Click 'manage' in the 'manage students' box
- Find the class you would like to move students from and click on the blue arrow next to it to reveal the names of all the students in that class.

- Select the students you would like to move and click 'move to another class'

- Select the class you'd like to move the pupils to and click 'move pupils'

How to delete a class
When a class is empty, you can delete it by clicking the three dots next to the class and then clicking 'Delete class', as in the picture below:
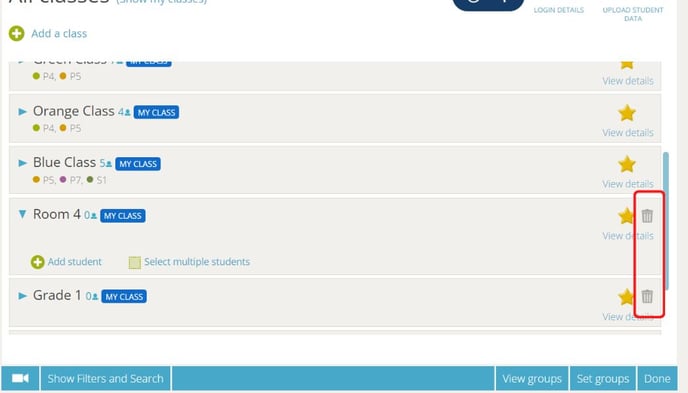
If there are still students in the class, you'll need to remove them before the trash icon will appear. Here are the steps to remove students from your school:
- Go into Settings from your teacher dashboard
- Click 'manage' in the Manage Students box
- Click on the box to the right of the class you would like to delete. This will select all students in that class

- Click the delete icon

- You will see the message below informing you that pupils will remain in the 'Deleted pupils' tab for 6 months before being deleted permanently. If you would like to proceed, click 'delete pupils'

5. Print login details
See the instructions below on how to find and print your students' login details:
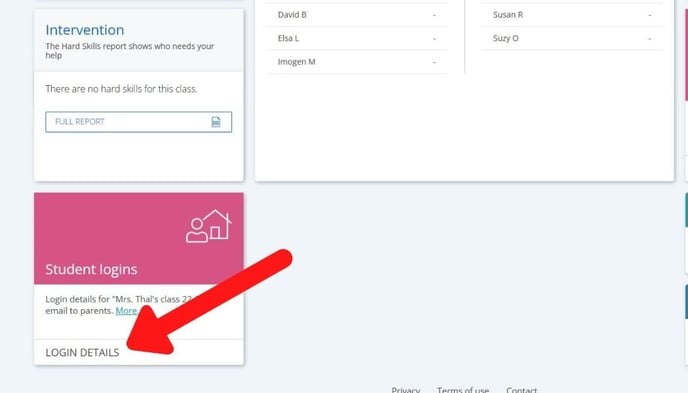
- Click 'login details' in the Student Logins box on your Teacher Dashboard
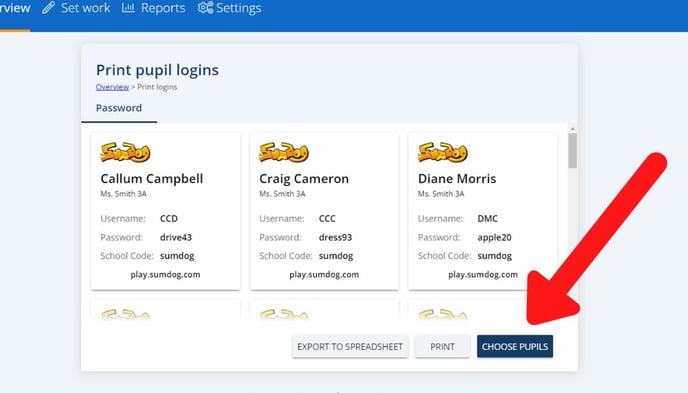
- On this page you'll be able to see the login details for the class that was selected on your Dashboard. If you would like to view login details for a different set of students, move on to the following steps. Otherwise, click 'print' to print the login details for your class.

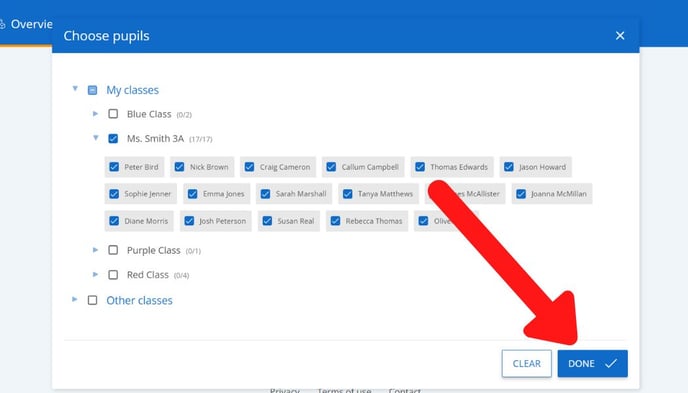
- To select specific classes/students to view login details for, click 'choose pupils'
- Select the students you want to view and print login details for. Click 'done' to return to the page where you can view and print their login details.
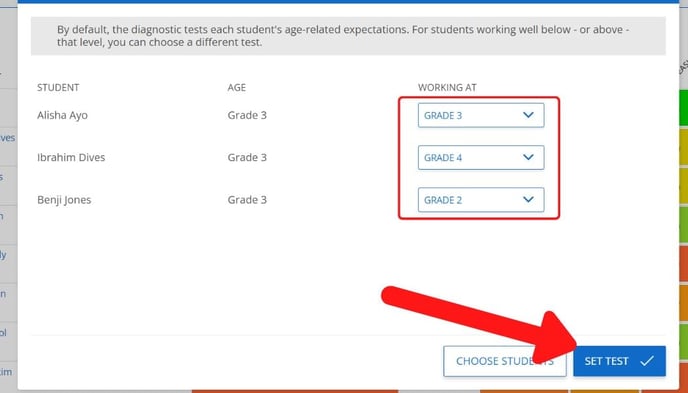
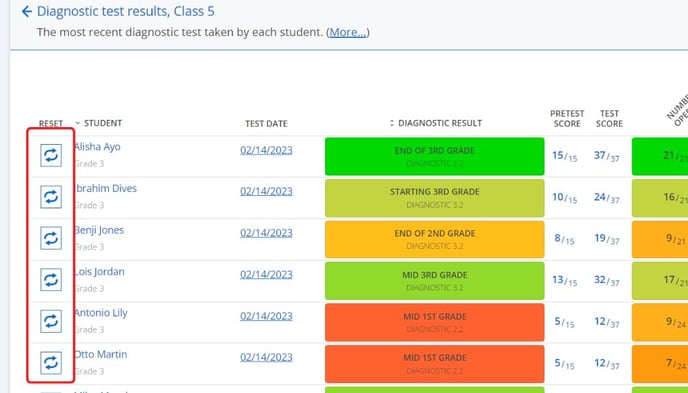
6. Reset the diagnostic
The diagnostic test determines the level your students will be working at on Sumdog. You can reset the diagnostic by following these steps:
- Click 'reports' at the top of the Teacher Dashboard. Ensure you have selected your desired class and subject. You can change these using the dropdown menus at the top left
- Click 'check' in the Diagnostic Results box
- Click the refresh icon next to one of the students you would like to reset the diagnostic for.
The student chooser window will pop up, and the student you clicked the refresh icon for will automatically be selected - Select any additional students you would like to reset the diagnostic for by clicking the box next to the student’s name. Click 'next'
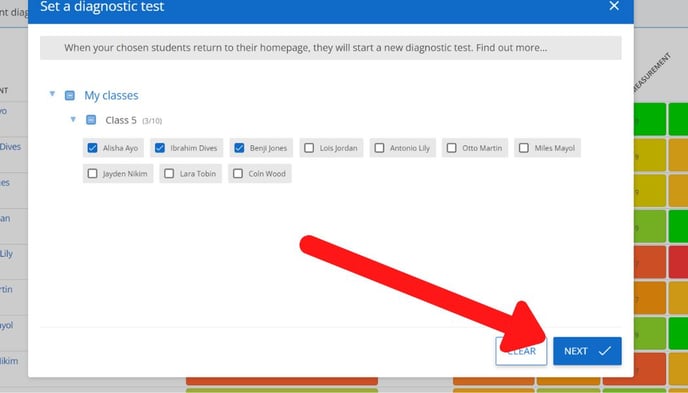
- Optional: If you’d like to customize the diagnostic (for example, if a student is working below level and may be put off by a too difficult pretest), click the dropdown menu on the right and select the grade you would like the diagnostic to be set at.
Click 'set test'. The diagnostic will then appear on the select student(s) dashboard.